I am a photographer - I have a business and a website. I take personal portraits, wedding photos, or shoots just for fun. My personal favorite, though, is what I call glamor photography - where you dress up a model and pose them in extravagant or beautiful ways to show off their loveliness or awesome clothing. And in this article, I'll tell you how I manage to get my own results, and the things I've learned along the way.
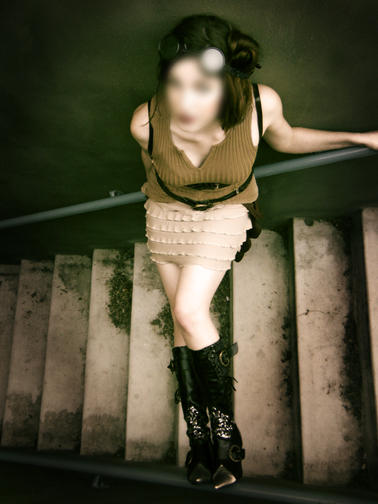
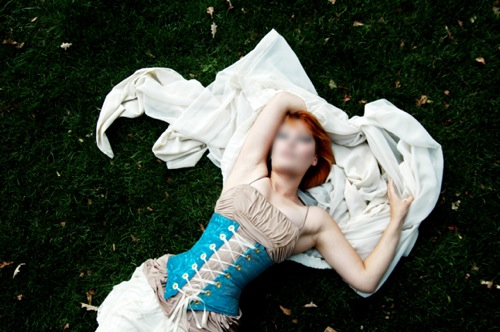
Here are two examples I will be referring to:
What you'll need:
A pretty friend
Some random, classy, or creative clothing
A camera
Some sheets and/or a nice outdoor setting
Lots of lights
Photo editing software (Gimp, Photoshop, etc.)
Step 1: Preparation
Find a model. As I do fashion and glamor portraits, all of my models are girls. Get someone with a unique or striking face - and remember, just because someone is 'pretty' doesn't mean they're photogenic. I've had models who had beautiful facial structure in person, but somehow on camera they just didn't seem alive. Find someone who can express a strong emotion through their eyes.
It shouldn't be hard. Who would say no to a photoshoot?
Get your camera. I started out with a basic 70-dollar camera (it's what I used to get the first picture), and you can use that if you'd like - it'll just be a little more difficult to get a good shot. If you're not camera-savvy, auto will be okay as long as you're not in environments with weird light.
Look at other glamor photoshoots. Remember a few poses they used, keep note of the light, the costuming, the backgrounds. Keep this in mind as you're snapping your photos.
Find a setting. I normally shoot outside on cloudy days - both images included were taken during overcast skies. When you have direct sunlight, the light is harsh, sharp, and it will make your model look uglier than she actually is.
And make SURE you have good light - as soon as your day starts to hit twilight, your photos will get progressively worse. Do not shoot at night. Do not use flash (unless you have something in front of it to dim it). The more light and the softer the light, the better your photo will look.
If you're going to shoot indoors, gather as many lights as you can into the room. Floor lamps, table lamps, ceiling lamps - but never point any of them directly at the model unless you have a screen in front of it. A lightbox is pretty much a simple light shining through a semi-transparent white cloth - so just hang white cloths in front of your lights if you can.
If you have one of those big chinese lantern things, or know someone who does, those are awesome for photography. For one, they're a natural soft light, and if you have a bunch of them you could easily achieve professional lighting, and for two, you can have your model actually interact with the light for some extra interest to the photo.
I don't have a lot of money to spend on fancy backdrops, so I usually use colored sheets. Patterned sheets are a bad idea; they make your photo seem more tacky. Get a solid-color of sheets or blanket (the cloth used in the second photo was actually her window curtain), and drape them over a sofa. Don't tuck them in - let folds hang and drape, use lots of fabric. Hang stuff on the wall behind the sofa. I smooth out wrinkles in photoshop afterward.
Step 2: The Shoot
You have your model, dressed in your most awesome clothing (remember: more layers and more lines in the clothing means a more interesting photo), so now you've just got to sit her down and take pictures of her.
Put her in crazy poses - upside down, sideways, arms at weird angles. It takes some practice to get a good eye for what looks decent or not, but eventually you'll get something. The first photo you see here, I made my model balance on two railings. Poor girl was horribly uncomfortable and nearly toppled over, but hey - I got a good shot!
Take lots of photos - and I mean lots. During a typical photoshoot I take maybe 700 photos, and on average I come out with 8-10 finished ones. Go crazy with your camera. Never stop pressing that button - even when the model is changing poses or moving around or even talking to you. I've gotten some amazing shots while a model was standing up from a sitting position, or just turning to look at me after I called her name.
Make sure all the light is even on her face, and make sure you get her whole body with each shot. You can always crop afterward, but you can't magically extend the photo (unless you're a crazy awesome whiz with photoshop's clone tool).
Be creative. I had my model take that curtain you see and spin with it. Flowing material is wonderful for draping or spinning or wind or pretty much anything. Find a big awesome sheet and love it.
Step 3: After-editing
I use photoshop myself, though you can achieve at least some of these affects with Gimp or even Microsoft's basic photo editor (I don't think Windows 7 has it, though).
I usually remove blemishes (by taking other skin next to it and moving it over the blemish), whiten teeth, clean up scars or acne or extra unflattering hair. I brighten the whites of the eyes and make the reflections sharper. I add pink to the lips and cheeks and even out the skin color. If you want to go really hardcore, I sculpt the face a teensy bit - shadows under the cheeks to make the cheekbones seem larger, take the eyes themselves and make them a little bigger, plump up the lips, slim down any fat, etc. You can do all these very subtly, so that people can't tell that you actually did anything (In the second photo, the model's actual arms and waist are larger, there was some armpit stubble, and her hair most certainly was not red).
For the photo itself, you usually want to up the contrast - make the darks darker and the lights lighter. Any editing program you use will probably have some sort of basic contrast bar. (If you wanna get advanced in photoshop; I duplicate the base layer, turn the blending mode to soft light and desaturate the 'soft light' layer). If you can adjust the color, you usually want to make it cooler. Color's hard to play with very easily, but even a little bit of tuning can really brighten up a photo.
Another tip is to darken the edges of the photo. Be careful not to go overboard with this one - a little darkening can bring the focus sharply into the center of the photo, the brightest part. The first photo has a good bit of corner-darkening, the second a very slight amount.
If you don't know how to do any of these things, simply google the basic action you wish to perform and the name of your program. Tutorials abound.
And there you have it! Your very own glamor photos. Do it for friends as gifts or start up your own business - but remember, have fun!
-Antier
