I've been noticing, since about December, that a lot of people are now beginning to show interest in designing. Many are trying to focus only on shirts, some on eyes, and some on everything. The main thing people are desperate to get perfect is a hair. There are are a few hair tutorial videos and a few articles floating around Whyville right now, but I want to try and make it as clear as
I can in this article step by step.
I know I am not the best hair-maker on Whyville, but I'm going to be conceited for a second and say I am not far behind. I have been making mainly hairs for years. I started in 2009, and have made
hundreds. (Good luck tracking them all down!!) Over these 5(+/-) years, I have figured out what looks good and what doesn't.
When making a hair there are a few things you need to look at. You need a good color and a plan of all the colors you are going to use. Also you need to know what kind of hair you are making, and the base. Then you need to shade and highlight your hair. Finally, you finish it!
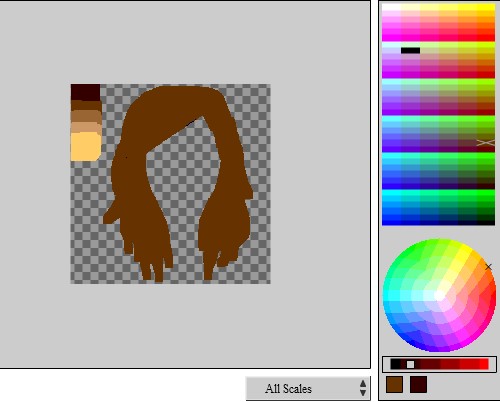
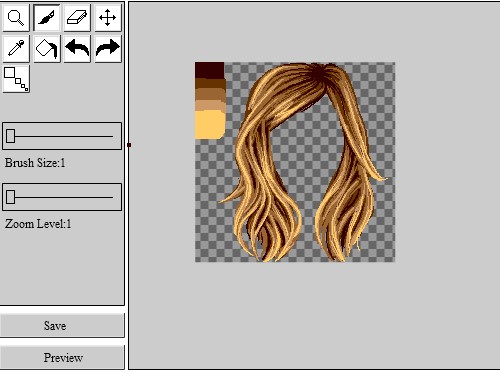
Colors can be very intimidating when you open the ffv. You go in there prepared, and then your mind goes blank when you see 236 colors staring at you with a blank space to draw in beside it . . . Don't worry! It's not as overwhelming as you think. Pick a color. Any color. Let's say that color
was a dark brown. How do you know what to highlight it with? where is the next shade lighter that is the right one? There is a really nifty trick that works 98.526% of the time to get the perfect colors! Start at that brown color you just chose and go up 7 boxes and over to the left 1. The color
you are on now is the color you highlight with, and it will work all the way up with almost any color. This also works the same with the colors you shade with! Just do the same thing but down and to the right instead of up and to the left!

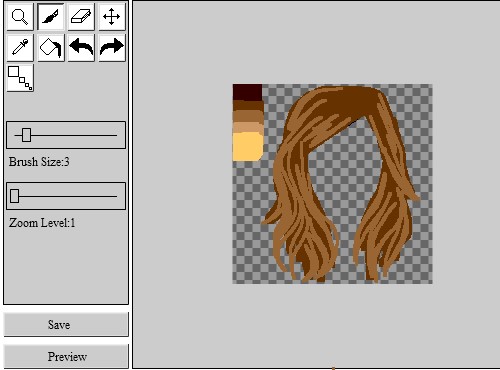
So now you have your colors, but what are you going to do with them? It's now time to make your base. Some things you need to think about while doing this is . . . Is it going to be a long flowy hair? Is it going to be a short bob cut? Will it be curly or straight? These are the things that you should always know before you begin shading and highlighting your hair. A lot of people use a reference picture, and while that may be helpful for them . . . it is definitely not for me! I often see a hair I like and make one INSPIRED by it instead of trying to make it exactly like it. At this point your hair will be looking not so great, but don't give up yet!
On a good day, one of my bases is a big blob of all one color . . . no specific shape and no individual strands of hair . . . Just a big blob of nothing with a hole in the middle big enough to fit a face. Do not judge your skills on how well your base is. Do not give up if you think it looks like a big pile of half-melted ice cream on the asphalt at Disney world.
Now you have your colors and your base, but you are staring at it and thinking, "What did I get myself in to . . ." You are nowhere near finished yet so just forget all judgement you have made.
Now is the interesting part . . .
Shading and highlighting. This is the part a bunch of people just cant get right. Go to one shade lighter than your base color (Remember from the color paragraph? 7 up, and 1 to the left!) You are going to loosely scribble in some lines where the hair would be lighter with brush size 2 or 3. Think of when you are outside and the sun hits your hair . . .
Where is it the lightest at? This is where you are going to put this color. During this step it is very important to pay attention to the direction of your strands. Always start at the top of your hair and work your way down. This will (almost always) make your hair look more flowy than if you started in the middle. Do not spend too much time on this or get irritated if it is not working out for you because almost all of this will be covered soon.
Next shade up! From now on (if this was me making the hair) I would be using brush size 1, and zoomed in to 3, 4, or 5. Do not use the half zooms like 3.5, 4.5, 5.5, etc. because they are glitchy and will make your lines look very pixelly and uneven. You are going to be focusing on only the lighter parts you just shaded. For this step you are going to be beginning to make thick individual strands. Make sure almost each one is connected, but all starting at different places. This is important for making sure the hair looks more realistic. Keep doing this until you have shaded almost every strand you made with the last color. Now you are going to go back down to the last color you had, use brush size 1, and make some thin strands in between the highlights. By this point you should be seeing the hair come together, but you will still hate it.
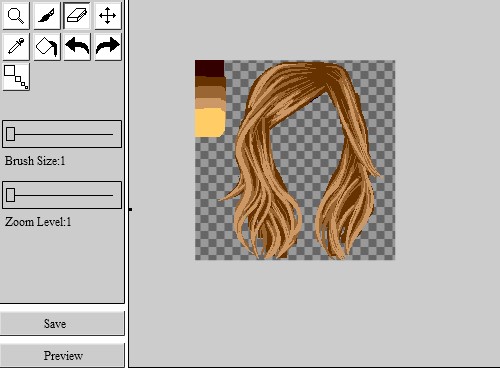
Now start at your base color and go 3 shades up! (Up 7, left 1 three times.) This is where you start being careful. Take your time with this part because it is the last, or one of the last colors the citizens see. You are now going to make thin individual strands on the color you drew with last step (the lightest one.) MAKE SURE you do not shade every strand or your hair will not look unrealistic. There should not be a lot of this color on your hair.
Once you are happy with that, you are going to go to your base shade. You now are going to go DOWN 7, and to the RIGHT (or if you are at the side, ignore the right part.) You are going to color IN BETWEEN the light colors you highlighted with. This is the SHADING, so only use this where there would be a shadow, or where the sun does not shine. There might be a lot of this, or a little bit. It is totally up to you. By this point you should like the hair you have created.
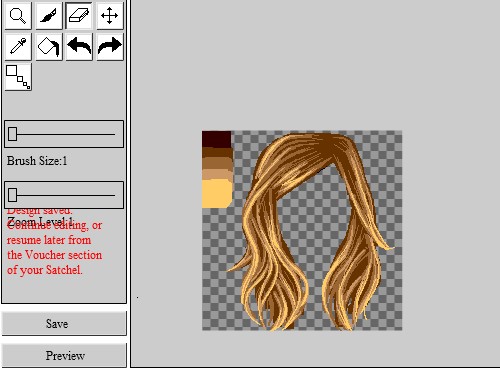
Finally, you are going to finish your hair. Look at your hair. Is it uneven and bumpy? You might want to fix that right now because once you submit, you can't go back. Once you are happy, click the scale button, and make sure you like what it did to the different scales. Now you are done! Name your hair, describe it to Akbar, and assign it the correct category!
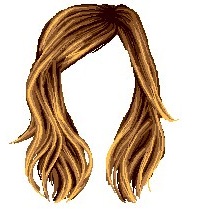
Congratulations! You have just made a perfect hair! Keep practicing to get better
and better each time!
Author's Note: I am not a writer. This is probably full of grammar and spelling mistakes.
Who cares? Not me!
